Category: WordPress

  • Block Bindings UI Guide

    After hours of piecing together articles and testing things on my own templates, I bring to you my tried-and-true method of using the new Block Bindings UI!

    Block Bindings API

    In the simplest terms, the Block Bindings API, introduced in WordPress 6.5, allows blocks to display data from custom fields.

    Block Bindings UI

    The Block Bindings UI was integrated into the WordPress core in version 6.7. This allows you to bind custom data to a block by selecting an attribute in the right column of the editor.

    Which blocks allow bindings?

    At this time, only the following blocks and their attributes are supported:

    BlocksAttributes
    Paragraphcontent
    Headingcontent
    Imageurl, alt, title, id, caption
    Buttonurl, text, linkTarget, rel
    Navigationurl
    Post Datedatetime

    What do I need?

    1. WordPress, at least version 6.7, which is when the Block Bindings UI was introduced. But don’t use an old version, update to the latest, which at this moment, is 7.0
    2. Advanced Custom Fields (ACF) (or an equivalent custom field plugin). WordPress also has built-in custom fields, but configuration instructions should be similar.
    3. WPCode (or equivalent plugin). A little PHP code will need to be added, so a plugin will help avoid touching the theme PHP files.

    Add a custom field to a template

    Let’s start by using ACF to add a single custom field to only show on pages.

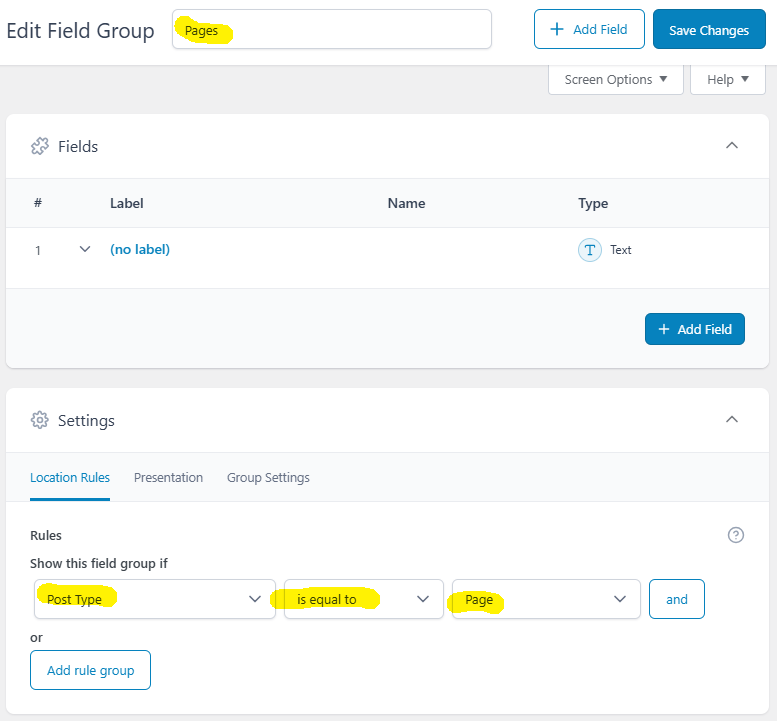
    In WordPress Admin, go to ACF > Field Groups, then Add New. Name it whatever you want, but choose a name that reminds you where the fields are. In this case, the fields will only display on pages, so I’ve named it “Pages.”

    Under Settings > Location Rules, set a rule:

    Show this field group if Post Type is equal to Page
    Now we will add a single field, called “Phone Number.”

    Fields > General

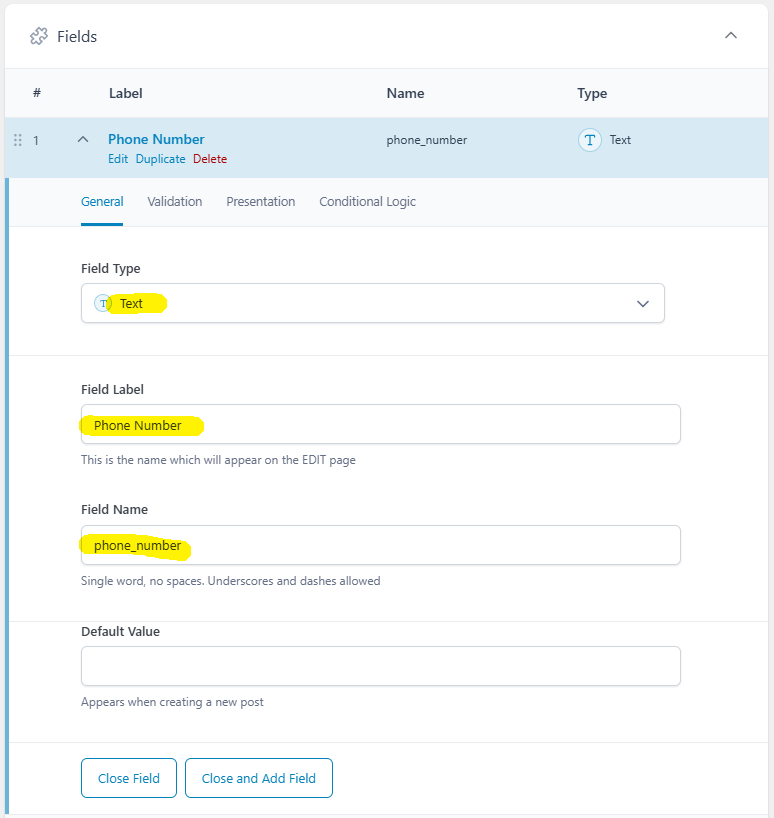
    • Field Type: Text
    • Field Label: Phone Number
    • Field Name: phone_number

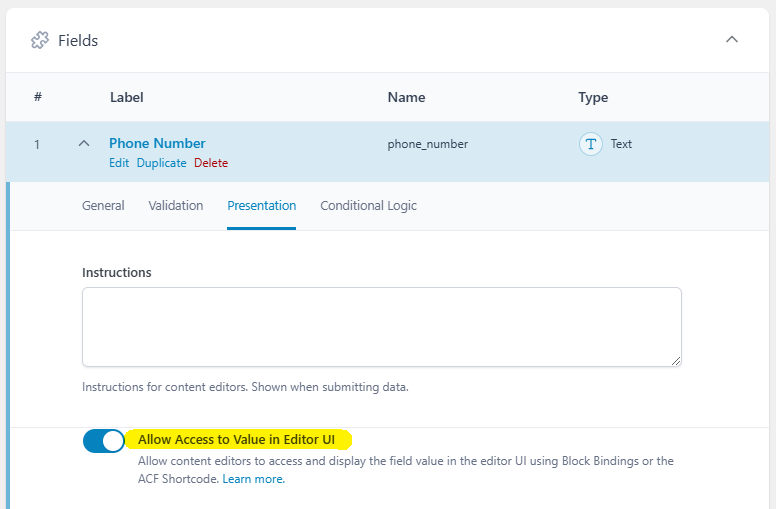
    Important: The following option must be checked for the Block Bindings UI to read the data.

    Fields > Presentation

    • Allow Access to Value in Editor UI: Checked
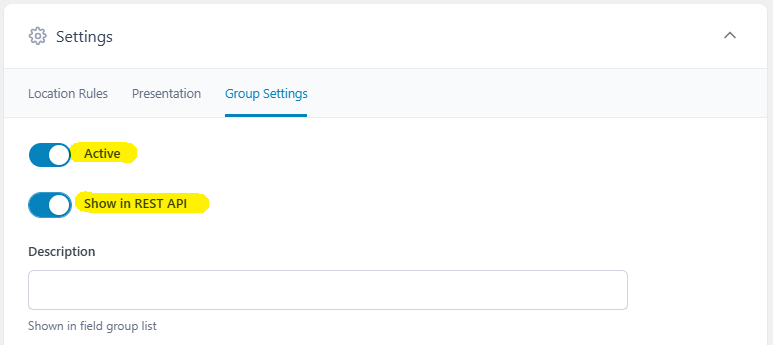
    Settings > Group Settings

    • Active: Checked
    • Show in REST API: Checked

    Now Save Changes. The rest of the settings are mostly visual, and can be adjusted as you wish.

    Place a custom field in a template

    Let’s make a very simple custom template that uses this new Phone Number field. There are two ways to get there.

    Appearance > Editor

    or

    Appearance > Themes > Customize

    Both go to the same Design screen with Navigation, Styles, Pages, Templates, and Patterns.

    • Choose Templates.
    • Add New Template, then choose Custom template.
    • Name it “Client Template.” If the screen asks to choose a pattern, just Skip.
    • Put down three blocks: Title, Paragraph, and Content.
    • Click “Save”

    Register Custom Fields

    This is a very important step. Go back to the main WordPress admin area. Add the following to a code editor or the theme’s functions.php file:

    add_action( 'init', 'register_meta_for_block_bindings' );
    function register_meta_for_block_bindings() {
    	register_meta( 'post', 'phone_number', [ 
    		'show_in_rest'  => true, 
    		'single' => true, 
    		'type' => 'string',
    		'sanitize_callback' => 'wp_strip_all_tags', 
    		'label' => '[Location URL]',
    		'default' => ''
    	] );
    }

    Notice the “phone_number” value. That is the name of the custom field. The first three attributes, “show_in_rest”, “single”, and “type” are required for this to work. The rest are recommended, but optional.

    Save and publish the file, or activate the snippet.

    To be continued…

  • Creating the first template parts

    If you haven’t done it already, make a templates folder inside your theme folder, and place a blank index.html inside it.

    Then, if it doesn’t exist, create a parts folder inside the theme folder, and blank header.html and blank footer.html files

    Your site structure should look like this now:

    • parts/
      • footer.html
      • header.html
    • templates/
      • index.html
    • index.php
    • style.css
    • theme.json

    Header and footer files

    Add the following blocks to the header.html file. We can change this later, this is just to get a couple of blocks in the file to start:

    <!-- wp:site-title {"textAlign":"center"} /-->
    <!-- wp:site-tagline {"textAlign":"center"} /-->

    Add the following to the footer.html file:

    <!-- wp:paragraph {"align":"center"} -->
    <p class="has-text-align-center">Proudly powered by
    <a href="https://wordpress.org/">WordPress</a>.</p>
    <!-- /wp:paragraph -->

    Again, all of this can be modified in the editor later, we just want to get a default file ready for now.

    index.html

    Add the following code to the index.html in the templates folder, to combine the header.html and footer.html into one file:

    <!-- wp:template-part {"slug":"header"} /-->
    <!-- wp:template-part {"slug":"footer"} /-->

    The template-part block looks for files in themes/theme_name/parts/. A path to the file is not necessary.

    Next, we will add more blocks to the index.html.

  • Setting up theme configuration files

    style.css

    In the root of the directory, if it is not already there, make a file called style.css with the following content:

    /*
    Theme Name: Custom
    */

    The theme name is the only required part of the file’s header. All available fields are:

    • Theme Name: Name of the theme.
    • Author: The individual or organization who developed the theme.
    • Description: A description of the theme.
    • Version: Theme version, in x.x or x.x.x format.
    • Requires at least: Oldest WordPress version supported, in x.x format.
    • Tested up to: The last main WordPress version the theme has been tested up to, i.e. 6.4. Write only the number.
    • Requires PHP: The oldest PHP version supported, x.x format, number only.
    • License: Theme license.
    • License URI: Theme license URL.
    • Text Domain: The string used for textdomain for translation. The theme slug.

    In classic WordPress themes, the styles reside in style.css. However, in block themes, this file can be empty, as styling can now be handled in theme.json and in the theme editor.


    theme.json

    This is a configuration file for controlling editor and block settings, as well as applying default styles to blocks. To start, create a theme.json, if it is not already there, and add the following code:

    {
      "$schema": "https://raw.githubusercontent.com/WordPress/gutenberg/trunk/schemas/json/theme.json",
      "version": 3,
      "settings": {
        "layout": {
          "contentSize": "840px",
          "wideSize": "1100px"
        }
      }
    }

    The first line, for $schema, is a helper for your editor. Hovering over fields and values gives more information about how it works

    Many configuration options for theme.json will be presented in this blog. This is just the beginning.

  • Preparing a new site for full site editing

    The webserver will need some preparation for a WordPress block theme. Although there will be some assumptions made, the fundamentals of a WordPress site will be the same for everyone.

    First and foremost, WordPress needs to be installed. If it is not, go do that, then come back here.

    Next, and optional but recommended, install the Gutenberg plugin. You should know where to get it.

    Option 1: Building on an existing block theme

    Install the Twenty Twenty-Five theme, then activate it.

    Go to Appearance -> Themes -> Customize.

    Option 2: Building a custom block theme

    This option requires access to the files on the webserver, such as by SFTP. If your WP account has access, existing theme files can be edited under Tools -> Theme File Editor, although it is not recommended as a permanent solution. New files will still need to be uploaded through SFTP.

    On the webserver, in /wp-content/themes/, create a folder for the theme with any name, as long as it does not include the word “theme.” This is a WordPress rule when or if this new custom theme is uploaded to the directory.

    Place blank files with the following name and folder structure. Content will be added later:

    Inside this folder, with “blocksite” being the name of the theme:
    /wp-content/themes/blocksite/

    • parts/
      • footer.html
      • header.html
    • templates/
      • index.html
    • index.php
    • style.css
    • theme.json

    More coming soon.

  • Building a WordPress block theme from scratch

    The latest version of WordPress allows an entire site to be created within the WordPress admin interface. Templates, menus, template parts, and styles can all be created within the Site Editor.

    Site Editor

    Using the Twenty Twenty-Five theme as an example, the Site Editor can be found in Appearances -> Editor, or by using the Appearances -> Themes -> Customize button for the active theme.

    theme.json

    A configuration file, theme.json, is used for settings and styles for the entire site. Templates and parts can also be stored on the server, then referenced in theme.json for naming and categorization.

    More information

    This blog will assume you know what you are doing. I’ve been a web developer for many years, but I’ve just started developing block themes this year. It’s a new approach, but with familiar WordPress development roots. As you dig in, you will find new ways to do things that just “make sense.”

    More to come.